Setting Up a Pi at UCSD
Setting Up a Pi at UCSD
Getting Ready
This guide is written for the Raspberry Pi Zero W. More details and pictures for any Pi coming soon.
You’ll need:
- Raspberry Pi
- MicroSD Card
- SD Card Reader
- Power Cable (mciroUSB for Pi Zero)
- Power Adapter (5V 2A or 5 3A)
- Windows Computer (Other guides coming soon?)
Technically, you also need a web browser, but how else are you reading my guide?
Download the following files and programs to your computer:
- Raspbian: I reccomend Raspbian Buster Lite although you can use the desktop version if you want.
- Etcher: Install this program after downloading.
- A Code Editor (Like Notepad++ or VS Code): Notepad will not work because Linux and Windows end lines in text files differently.
- A SSH Terminal (Like PuTTY): You might already have a similar tool built in.
Gathering Information
You’ll need your Raspberry Pi’s MAC address in order to register it with ResNet and get the Pi running online 24/7. To do this, follow these steps to install Raspbian on your Pi:
-
Plug in your SD card reader into your computer with your microSD card plugged in. You may need an SD card adapter.
-
Run balenaEtcher and select the Raspbian image you downloaded, and select the target as the microSD card you just plugged in. Press Flash!
-
Wait for the process to complete, and verify there are no errors. If there are errors, try steps 1-2 again.
-
Your microSD card will now appear on your computer as multiple drives, including some Windows can’t read. If any popup opens up that asks you to format a disk, select cancel. Open up the drive that is labeled “boot” and create a new blank file called
ssh. -
Then, open up your code/text editor of choice and create a file that says:
ctrl_interface=DIR=/var/run/wpa_supplicant GROUP=netdev update_config=1 country=US netwrork={ ssid="testformypi" scan_ssid=1 psk="mycoolpi1234" } -
Go to your computer’s Settings, click on Network & Internet, then click Mobile Hotspot. Click Edit, then set your Network name to
testformypiand your Network password tomycoolpi1234. If you look at step 5, you can see where these come from. You can set them to anything you want as long as they match and don’t have spaces or weird characters. If Network band is an option, try to set it to 2.4 GHz. If your internet disconnects in a future step, come back and set it to Any available or 5 GHz instead. -
Plug in your Raspberry Pi to power and turn on your Mobile hotspot on your computer by toggling the box that says Share my Internet connection with other devices.
-
In a few moments, your Raspberry Pi should pop up in your computer’s settings under a table as
raspberrypi. There will be also a column called MAC address and IP address. Make a note of the MAC address of the Raspberry Pi by taking a screenshot or writing it down somewhere.
Preparing a Remote Connection
If you want to skip ahead and prepare something before doing this section, I reccomend doing step 1 of Getting Online. You’ll need to do this section before doing the rest of Getting Online.
-
If you’re continuing from the last section, your Raspberry Pi should still be wirelessly connected to your computer. If not, repeat steps 6-8 in the last section.
-
Next, we’ll want to remotely connect to our Raspberry Pi. Open up the SSH client of your choice. For the purposes of this tutorial, we’ll use PuTTY. If you know what you’re doing, follow along these steps with the SSH client of your choice. (Perosnally, I use Termius, but MobaXTerm is also very popular.)
-
For host name, type
raspberrypi. Then click Open. If this doesn’t work, go back to your computer’s Mobile hotspot settings and paste in the IP address forraspberrypiinstead. -
If you see a prompt to trust RSA keys or to trust the device, accept it. You may have to type something like
yesdepending on your SSH setup. When prompted for the username, typepi. The password israspberry. -
We will now update the hostname of your Raspberry Pi. The hostname is basically your Raspberry Pi’s friendly-sounding device name, and right now it’s
raspberrypi. We want to change it so if someone else sets up a Raspberry Pi you don’t get confused which one you’re connecting to. To do this, runsudo raspi-configin your terminal. If you need to enter your password, enter your password.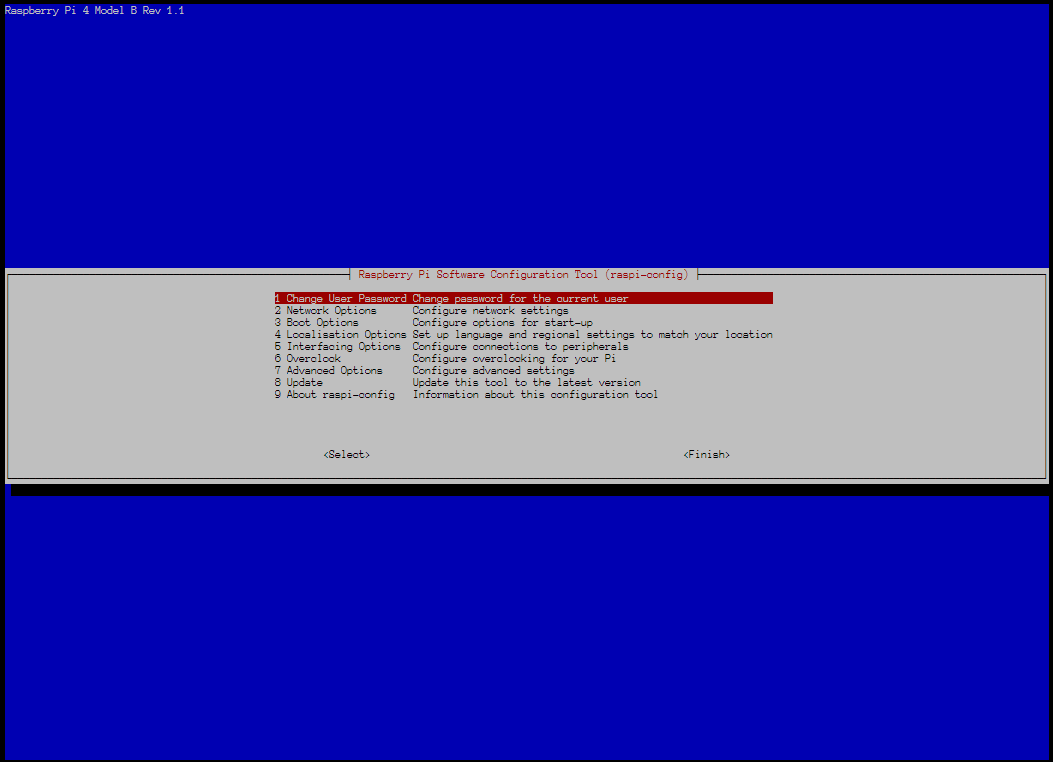
-
Scroll down to (2) Network Options and press Enter. Then scroll down to (N1) Hostname and press Enter. Accept any FCC warnings that popup, then set a new name and press Ok. Exit the
raspi-configby clicking on all the Finish buttons on the dialogs, and restart if you are prompted to. If you are not prompted to, typesudo rebootin your terminal. You will now be disconnected from your Raspberry Pi.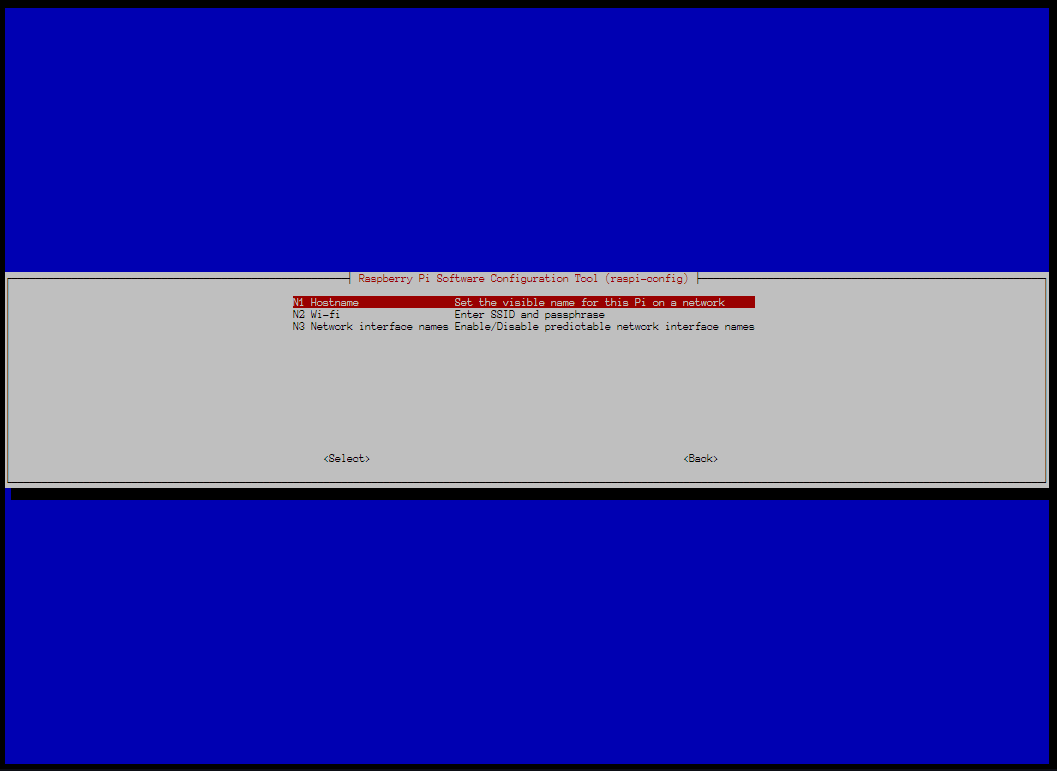
-
At this point, you’ll notice that your Raspberry Pi will disappear from your connected devices list in your Mobile hotspot settings. It should reappear with the hostname that you selected in step 6.
-
We now want to change your login password, because someone with the default username and password is too easy to break into your Raspbery Pi. Changing your username is a more convoluted process, so for the purposes of keeping this tutorial simple we’ll leave the username as
piand only change your password. Open up PuTTY or a SSH terminal of your choice and enter the new hostname of your Raspberry Pi. If this doesn’t work, you can manually enter the IP address and click Open. -
Type
sudo passwdin your terminal. You’ll be prompted with your old UNIX password, which israspberry. (In some versions, you won’t be. If you aren’t, you can proceed as normal.) Then, you’ll be asked to enter your new UNIX password. Choose something here that is easy to remember (or hard!) and not too easily guessable (in short: use good password practices). -
Your new password from here on out will be the password that you picked.
Subsection: Updating Packages
This section isn’t required if you followed all the steps above exactly, but it’s reccomended. However, you can skip it if you want. The next section you’re looking for is Getting Online.
-
You’ll need your Raspberry Pi to be connected to your computer like the previous section. If it’s not, repeat steps 6-8 from the section Gathering Information. In addition, connect to your Raspberry Pi using an SSH terminal as in steps 2-3 or step 8 of Preparing a Remote Connection.
-
In your SSH terminal, type
sudo apt update. This will sync your Raspberry Pi’s known apps with the internet. Then typesudo apt upgrade -y. This will update all the currently installed apps to the latest version.
Getting Online
Now that we have the MAC address, we want to register it with ResNet in order to keep the Raspberry Pi connected online.
-
Visit the ResNet portal page by clicking this link. You’ll need to log in with your UCSD credentials and then you’ll be presented with a form to register your device. Fill out the form truthfully, you can put Raspberry Pi as your device type and fill out the same MAC address you saved earlier. Capitialization in your MAC address does not matter.
-
In a few hours, you will get an email from someone at the help desk saying your device has been registered. During this time, plug in your microSD card back into your computer.
-
Just like before, you will see some popups asking you to format the disks you plugged in. Press cancel.
-
Open up the drive that is called “boot” and look for a file called wpa_supplicant. If you find it, delete it. Then make a new one. If you can’t find it, just make a new one.
-
Inside the code/text editor of your choice, write the following into your text editor:
 ctrl_interface=DIR=/var/run/wpa_supplicant GROUP=netdev
 update_config=1
 country=US

 netwrork={
     ssid="RESNET-6TH-RESHALLS"
     key_mgmt=NONE
 }
Do note that if you don’t live in the Sixth College Residential Halls, you’ll have to put the name of the wireless network for your dorm instead that provides internet access without a password.
At this point, you’ll want to remotely connect to your Raspberry Pi. But how does your Raspberry Pi get online? Follow the following subsetions, starting from Domain Setup.
Subsection: Domain Setup
This section is required if you’re on a network like UCSD, where every time your Raspberry Pi connects you’ll get a new, random IP address. How do you guess your IP address? You don’t - here’s how to bind it to a name that’s easy to write or say.
-
Keep your terminal open, but put it in the backgroud. You’ll now need a domain, and we’ll be using a feature called Dynamic DNS in order to set this up.
-
If you already have a domain, great! You can skip to steps ~STEP~ to continue the setup. If not, I reccomend purchasing one from a website like Google Domains or Namecheap if you want a .com domain like gideontong.com. For a free option, check out no-ip. For the purposes of this guide, we’ll use no-ip because it’s free.
-
On the homepage, pick a hostname and a domain. For the purposes of this guide, I picked
ucsd.hopto.org. Complete the signup form and process as normal. -
Return to the Raspberry Pi SSH terminal window, and run
sudo apt install ddclient -y. This will install an app called DDClient, which will update your Raspberry Pi’s IP address whenever it changes. -
Next, run
sudo nano /etc/ddclient.conf. It will open up a text editor. Change everything in the text file to look something like this (this is only relevant if you’re using no-ip. I’ll also be writing a guide if you’re using Namecheap, which you can access here):protocol=dyndns2 use=web, web=checkip.dyndns.com/, web-skip='IP Address' server=dynupdate.no-ip.com login=YOUR_USERNAME password=YOUR_PASSWORD YOUR_DOMAINAs an example, my config should look something like this:
protocol=dyndns2 use=web, web=checkip.dyndns.com/, web-skip='IP Address' server=dynupdate.no-ip.com login=gideontong-example-username password=gideontong-example-password12345 ucsd.hopto.org -
Then, you’ll run the following set of commands:
sudo /etc/init.d/ddclient restart sudo systemctl enable ddclient.service sudo systemctl start ddclient.service -
Now, your Raspberry Pi should automatically run DDClient whenever it changes its IP address, and you’ll be able to remotely connect to it whenever it’s connected to the internet by connecting to the domain name you picked. To make sure DDClient is running, run the command
sudo systemctl status ddclient.service.
Subsection: Remote Connect
-
By the point, you should know how to remotely connect and execute commands on your Raspberry Pi, even if you don’t know what commands there are or how to actually use the commands. In your SSH terminal, you’ll no longer be using your hostname to connect.
-
Turn off your computer’s Mobile hotspot, and in a few moments, your Raspberry Pi should connect to your dorm’s wireless network. Within a few minutes (usually not less than half an hour, but it could be up to 6-12 hours depending on your service provider), you should be able to replace the hostname you put in PuTTY or the other SSH program of your choice with the domain name you set up in the previous section.
Complete
At this point, your Raspberry Pi should now be setup and online. To continue the guides, return back to the normal Raspberry Pi guides here on starting your first project.
If you’d like to learn about uploading files to your Raspberry Pi to use later, you can learn about what SSH is here.